The great thing about yoga is that there is a wide variety poses to choose from – therefore giving us an almost infinite number of combinations and sequences to practice. BKS Iyengar’s most famous book, Light on Yoga – also known as the ‘yoga bible’, contains descriptions and instructions for more than 200 poses!
But it’s not just the poses themselves that vary. Within each pose, there are many options and adjustments available, including the use of props. These variations can often help us to:
· Perform difficult or advanced poses
· Gain a better understanding of a pose
· Gain a different understanding of a pose
· Remain in the pose for longer periods
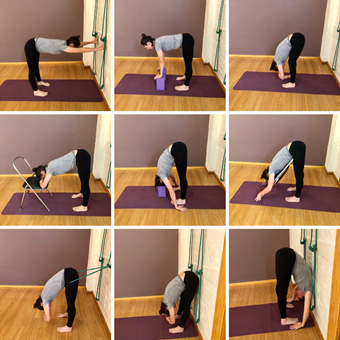
We previously shared a Spotlight on Uttanasana blog (standing forward bend), with basic instructions – which you can read HERE. So, today Romina is going to show you nine (that’s right – 9!) other ways to also do this pose.
1. Half Uttanasana to a wall
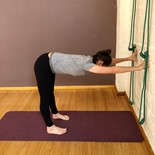 A great option if you’re an absolute beginner, get lower back pain or are pregnant - this version allows you to open the back of the legs, while learning to lengthen in the spine and keep the front body long at the same time.
Here you can see Romina is trying to create a right angle with her body, lifting her kneecaps, and thighs and keeping the lower back flat; soft and broad – not letting the belly drop.
Pressing the arms straight and strong into the wall also lets her find great length and space through the whole torso – front, back, left and right sides! Keep the arms and feet at hip and shoulder distance apart for this one.
2. Uttanasana with hands on bricks
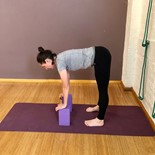 Similar to the wall version mentioned previously, but instead Romina is bringing her arms and hands lower onto the bricks – to get a bit deeper into the forward bend action.
This variation is also often used in beginner classes as it allows students to create the same long, straight spine and torso as the wall version but also start to take the journey down to the floor.
It’s important to press the hands flat onto the bricks with the arms straight, to help keep the chest open and lengthening away from the belly. As you progress, you can also take the blocks down lower – and with 3 heights to choose from, you almost get 3 poses in one!
3. Uttansana with the knees bent
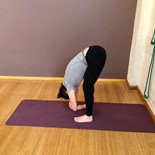 We don’t often teach this variation in Iyengar yoga, but it can be helpful for people with really tight hamstrings as it allows them to get the feeling of releasing the spine and head forward and down.
You can see Romina has her knees bent just a little, so that her belly comes into contact with the top of her thighs. This allows her to soften any gripping or tension in the belly and shoulders - which happens when we’re first learning to do Uttanasana.
Starting in this variation, and then slowly straightening the legs into the full version is a good option. Try keeping the belly and thighs connected or as close to one another as you do straighten the legs. Try this pose with the feet at hip width first and then try bringing them together.
4. Uttanasana with head support on chair
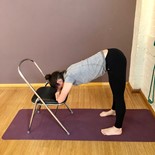 This variation is often used in restorative classes and is also a good option if you’re feeling particularly tired or stressed out, as it allows the brain to settle and quieten.
Similar to the first two Uttanasana options above, the idea is to keep the whole spine and torso long and open, but this time it’s the forehead that rests on the chair.
Don’t let Romina fool you, staying in this pose is more challenging than you may think – try putting on a timer for 3 – 5 minutes and let us know how you go!
5. Uttanasana with head support on brick
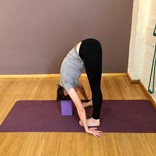 Here Romina is letting the top or crown of her head to rest down onto a block. This lets her get deeper into the pose, while keeping the head quiet and supported.
Unlike the previous version, the spine is fully released down towards the floor in this pose. So, it’s probably more suitable for intermediate to advanced students rather than beginners.
You can also play with the height of the brick – up high like Romina has it, halfway and even down flat if you can get there! You can also use multiple bricks stacked on top of each other depending on your ability.
6. Uttanasana with a chair into the hips
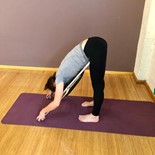 Chair yoga is gaining in popularity right now, and this Uttanasana version uses the back of the chair to help deepen and release the hips and groins back.
As you can see, the chair is folded closed with the feet away from Romina’s feet. The whole chair it at an angle so that the top of the chair is at the correct height – into the hips. If you’re particularly short, you can also stand on bricks so that the chair is at less of an incline.
The feeling of the chair into the hip crease, helps you understand where the folding needs to happen. Using the chair in this way also allows to you lay the front body along it and spread the back.
7. Uttanasana in the wall ropes
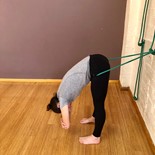 Similar to the previous pose with the chair, this version uses Iyengar yoga wall ropes around the upper thighs to support the upper thighs, as well as let the hip crease and groins deepen and move back.
Some people find the ropes are softer than the chair, but it depends what props you have available. In this version there is no support for the torso, so it’s up to you to keep the torso and front body open and long as you release down.
You do get to play with arm/ hand variations here too – you can take the hands to the shins, ankles or heels, to the floor in front or beside the feet. You can also hold on to the elbows like Romina is doing and you can even play with Padangusthasana (hand to big toe) and Padahastasana (palms under the feet) which are another two variations of Uttanasana!
8. Buttocks to the wall
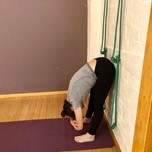 This may look like cheating, as you don’t have to hold yourself upright, but using the wall allows you to feel the buttock bones lifting up the wall allowing you to open and lengthen the upper hamstring area more.
Having the feet slightly away from the wall provides some freedom for the torso and you may even find that you can lengthen along the legs and go down lower into the pose.
Because we are fully supported of course, we can stay in this pose for a little longer than if we were just standing in the middle of the room. But staying for 2 – 3 minutes with the buttocks against the wall can be just as physically and mentally challenging, as doing the unsupported version!
9. Back to the wall
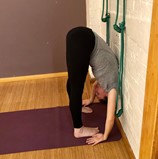 This is a good way to get a sense of your ‘hump-back’! By pressing the back into the wall, we are trying to bring the spine into the body rather than away from us, towards the ceiling. By doing this we can keep the chest and front body open and long.
It’s probably not a pose we would give a beginner, although you can take your feet as far away from the wall as you need to.
Just because the back on the wall seems to be focus of this variation doesn’t mean you won’t feel a strong stretching in the back of the legs. Stay for as long as you can bear it and enjoy the feeling of containment this version can bring!
Remember to always practice under the guidance of an experienced and certified Iyengar yoga teacher, let your teacher know of any injuries or health conditions and speak to your doctor or physiotherapist before starting any new exercise programs.
Which one is your favourite Uttanasana variation? Know of any other variations? Share your Uttanasana questions, tips and photos with us. Email info@yogatogo.com.au or message and tag us on Facebook, Instagram or Twitter.
